I stopped trusting most store-bought dog shampoos after reading the labels closely.
Some were packed with artificial fragrance, harsh detergents, synthetic dyes, and ingredients that honestly sounded more like a chemistry experiment than something meant for a dog’s skin.

And the problem is, dogs deal with that stuff differently than we do. Their skin is more sensitive, and many commercial shampoos can leave coats dry, itchy, or irritated after repeated use.
That’s what pushed me toward homemade dog shampoo bars.
Not because I wanted to become a soap maker overnight. Mostly because I wanted something simpler, gentler, and easier to feel good about using.
This homemade dog shampoo bar recipe creates a rich lather, cleans surprisingly well, and leaves the coat soft without that overpowering artificial smell many dog shampoos have.
It’s made with nourishing oils, dog-safe ingredients, and no unnecessary fillers.
If you’ve been looking for a more natural dog shampoo option, this recipe is a good place to start.
Why Homemade Dog Shampoo Bars Work So Well
A lot of people assume homemade pet products are complicated.
This one really isn’t.
Once you understand the basics, it becomes a fairly straightforward process.
Fewer Harsh Ingredients
Many commercial shampoos rely heavily on sulfates and synthetic fragrance.
Homemade shampoo bars give you more control over what actually touches your dog’s skin.
Budget Friendly Long-Term
One batch lasts surprisingly long.
And because the bars are concentrated, you usually use less product during bath time compared to liquid shampoos.
Great for Dry or Sensitive Skin
Ingredients like olive oil and castor oil help support moisture instead of stripping it away.
That can make a noticeable difference for dogs prone to dryness or itching.
Less Plastic Waste
A small bonus, but still worth mentioning.
Shampoo bars reduce the need for plastic bottles, which is nice if you’re trying to cut back on waste around the house.
Important Safety Notes Before You Start
Soap making is not difficult, but it does require careful handling.
Especially when working with lye.
About Lye
Lye, also called sodium hydroxide, is necessary for real soap making.
Without it, oils will never turn into soap.
During the soap-making process, the lye reacts with the oils through a chemical reaction called saponification.
Once fully cured, properly made soap no longer contains active lye.
But while making soap, lye must be handled carefully.
Always Follow These Safety Rules
- Wear gloves
- Wear eye protection
- Work in a ventilated area
- Keep children and pets away
And always add lye to water.
Never the other way around.
Homemade Dog Shampoo Bar Recipe
Ingredients
| Ingredient | Amount |
|---|---|
| Distilled Water | 7 oz |
| Olive Oil | 9 oz |
| Coconut Oil | 4.5 oz |
| Castor Oil | 3 oz |
| Tallow | 3 oz |
| Neem Oil | 0.5 oz |
| Sodium Hydroxide (Lye) | 2.75 oz |
| Lavender Essential Oil | 2 tsp |
What You’ll Need
- Digital kitchen scale
- Safety gloves
- Safety goggles
- Stainless steel container
- Heat-safe mixing bowl
- Immersion blender
- Silicone soap mold
- Thermometer
- Wax paper or towels
Step-by-Step Instructions
Step 1: Prepare Your Workspace
Put on gloves and goggles before handling anything.
Clear the area completely and make sure pets or children cannot access the workspace.
Soap making goes much smoother when everything is measured and ready before you begin.
Step 2: Mix the Lye Solution
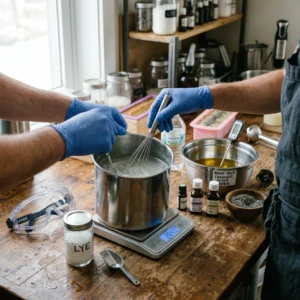
Measure the distilled water into a stainless steel container.
In a separate container, measure the lye carefully.
Slowly sprinkle the lye into the water while stirring gently.
The mixture will heat up quickly and release strong fumes for a short time. That’s normal.
Set it aside to cool until the temperature drops to around 100–115°F.
Step 3: Melt and Mix the Oils
In a heat-safe bowl, melt the coconut oil and tallow gently.
Once melted, add:
- Olive oil
- Castor oil
- Neem oil
Stir everything together.
Allow the oils to cool until they are roughly in the same temperature range as the lye mixture.
Step 4: Combine Oils and Lye
Carefully pour the cooled lye solution into the oils.
Stir slowly at first.
Then use an immersion blender in short bursts.
After a few minutes, the mixture will begin thickening slightly.
This stage is called “trace.”
What Trace Looks Like
You’ll know you’ve reached trace when the mixture:
- Resembles thin pudding
- Leaves faint trails across the surface
Step 5: Add Lavender Essential Oil
Once light trace is reached, stir in the lavender essential oil gently.
Lavender is commonly used because it has a mild scent and is generally considered one of the safer essential oils for dogs when properly diluted.
Step 6: Pour Into Molds
Pour the soap mixture into silicone molds.
Tap the molds gently against the counter to remove trapped air bubbles.
Cover loosely with wax paper and wrap lightly with towels to help retain warmth during the first stage of curing.
Leave untouched for 24 to 48 hours.
Step 7: Unmold the Soap
Once the bars feel firm enough, carefully remove them from the molds.
If they still feel soft, give them another day before trying again.
Step 8: Cure the Soap
This is the part most beginners want to skip.
Don’t.
Place the bars in a cool, dry area with airflow and allow them to cure for at least 4 weeks.
Why Curing Matters
The curing process helps:
- Harden the bars
- Reduce excess moisture
- Create a gentler final soap
Fresh soap is not ready for use immediately.
How to Use the Shampoo Bars
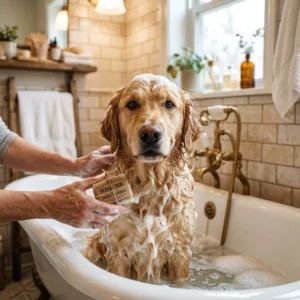
Wet your dog’s coat thoroughly with warm water.
Rub the shampoo bar directly onto the fur until a light lather forms.
Massage the lather into the coat gently, especially around:
- Paws
- Belly
- Chest
- Tail area
Avoid the eyes and inside of the ears.
Rinse very thoroughly afterward.
Soap residue left behind can cause irritation or itchiness.
Why Neem Oil Is Often Used
Neem oil has become popular in natural pet care because it may help support skin health and discourage pests naturally.
It’s often used in homemade dog shampoo recipes for:
- Dry skin
- Itching
- Flaky patches
- Flea prevention support
That said, neem oil has a strong earthy scent in pure form.
Once blended into soap, the smell becomes much milder.
Important Neem Oil Warning
Neem oil should generally be avoided for pregnant dogs.
Pregnant women should also avoid direct handling of concentrated neem oil during soap making.
If needed, you can replace neem oil with additional olive oil.
Common Soap-Making Mistakes
Over-Blending
Blending too aggressively can thicken the soap too fast, making it difficult to pour smoothly.
Use short blending bursts instead.
Using Tap Water
Distilled water works best because minerals in tap water can interfere with soap quality.
Skipping Safety Gear
Even experienced soap makers use gloves and goggles.
Lye deserves respect every single time.
Using Soap Too Early
The bars need proper curing time.
Using fresh soap before curing can result in softer bars and skin irritation.
Storage Tips
Store finished shampoo bars in a cool, dry place away from moisture.
A draining soap dish helps the bars last longer after use.
Properly cured bars can last up to a year when stored correctly.
Is Homemade Dog Shampoo Better?
Not automatically.
Some homemade recipes online are honestly poorly balanced and too harsh.
But a properly formulated dog shampoo bar can be a gentler alternative to heavily fragranced commercial products.
Especially for dogs with sensitive skin.
The biggest advantage is knowing exactly what’s inside the product you’re using.
Final Thoughts
Making homemade dog shampoo bars sounds intimidating at first, mostly because of the lye.
But once you understand the process, it becomes much more manageable than people expect.
And there’s something satisfying about using a product made with simple ingredients you actually recognize.
The first time I used a homemade shampoo bar on my dog, the biggest difference wasn’t even the smell.
It was the coat afterward.
Cleaner. Softer. Less itching. No heavy perfume scent lingering for days.
Just a clean, healthy-looking dog that seemed a lot more comfortable afterward.